Let’s be honest—grilled cheese is one of those nostalgic comfort foods we all crave. Crispy, buttery exteriors with melty, gooey centers—it’s like a warm hug in sandwich form. But on a keto diet, traditional carb-heavy bread is off-limits. Enter the keto grilled cheese chaffle, your new low-carb hero.
This Keto Grilled Cheese Chaffle delivers everything you love about the classic grilled cheese without the carb overload. It’s cheesy, crispy, quick to prepare, and incredibly satisfying. Truly one of those keto recipes that simply works.
Why This Keto Grilled Cheese Chaffle Recipe Shines
This is the keto grilled cheese you didn’t know you needed—but will want to make again and again.
Instead of bread, this recipe uses a clever cheese and egg combo cooked waffle-style, known as a “chaffle.” It sounds experimental, but it yields delicious, consistent results every time:
- ✅ Ultra low in carbs (~2g net carbs per serving)
- ✅ High in protein and fat to keep you full and energized
- ✅ Ready faster than you can pick a show on Netflix
We’re skipping the bread but keeping all the comfort you expect.
Essential Ingredients and Their Role

A handful of simple ingredients make this keto grilled cheese chaffle a standout:
- 🥚 Eggs – Provide the structure and natural binding for the batter
- 🧀 Shredded Cheese – The star ingredient. Go with sharp cheddar for that classic taste or experiment with mozzarella, provolone, or pepper jack for variety
- 🌰 Almond Flour – Optional but adds just the right texture and body to mimic breadiness without the carbs
- 🧈 Butter – Adds rich flavor and ensures a golden, crispy finish
Pro tip: Freshly grated cheese melts better than pre-shredded, but either works well.
Flavor and Texture You’ll Love
Doubt it can match your favorite grilled cheese? Think again:
- 🤤 Bold, cheesy flavor with a perfect buttery crunch on the edges
- 🧇 Toasty exterior paired with a soft, slightly chewy interior
- 🧘♂️ Ultimate comfort food satisfaction—without the carb guilt
This isn’t trying to replicate bread; it embraces all the best keto qualities.
Stress-Free Tips for Perfect Keto Grilled Cheese Chaffles
Get that perfect crisp every time with these tips:
- Preheat your waffle maker – Ensures even cooking and crispy edges
- Avoid overfilling – Use about 3 tablespoons of batter per section to prevent mess
- Let chaffles cool before assembling – Prevents soggy sandwiches
- Try different cheeses – Gouda, Monterey Jack, or fontina add exciting flavors
For an extra flavor boost, mix in garlic powder or Italian seasoning to the batter.
Common Pitfalls to Avoid
- 🚫 Skipping preheat—leads to uneven cooking and disappointment
- 🚫 Overfilling the waffle iron—causes batter overflow and burns
- 🚫 Using watery cheeses—fresh mozzarella can get soggy; mix with firmer cheeses for best results
Storing and Reheating Your Keto Grilled Cheese Chaffle
Leftovers? Here’s how to keep them tasty:
- 🧊 Store cooled chaffles (not assembled sandwiches) in an airtight container in the fridge for up to 5 days
- ❄️ Freeze individual chaffles between parchment layers for up to 3 months and thaw overnight in the fridge
- 🔥 Reheat in a toaster oven or pan-fry for maximum crispiness. Microwave only if in a pinch.
Make ahead and freeze plain chaffles to assemble fresh keto grilled cheese sandwiches anytime.
When to Enjoy Your Keto Grilled Cheese Chaffle

This versatile keto grilled cheese fits any mealtime:
- 🥗 Perfect for lunch with a low-carb slaw or tomato soup
- 🍽️ Great appetizer when cut into strips and served with marinara sauce
- 🍳 Ideal brunch upgrade topped with fried egg and bacon
Wherever you want a warm, satisfying bite, this keto grilled cheese chaffle delivers.
No bread? No problem. This Keto Grilled Cheese Chaffle checks all the boxes: fast, cheesy, low-carb, and endlessly customizable. Whether you’re just starting keto or a seasoned pro, it’s a comforting staple you’ll keep coming back to.
Bookmark this recipe and enjoy your new favorite keto comfort sandwich!
Keto Grilled Cheese Chaffle
Equipment
- Waffle maker (mini or standard)
- Medium mixing bowl
- Whisk or fork
- measuring spoons
- Rubber spatula
- Skillet or nonstick pan
Ingredients
For the chaffles
- 2 large eggs room temperature if possible
- 1 cup shredded cheddar cheese freshly shredded if possible, divided
- 3 tablespoons blanched almond flour fine grind
- 2 tablespoons grated Parmesan cheese optional, for extra crispness
- 1/4 teaspoon garlic powder optional
- 1/4 teaspoon Italian seasoning optional
- 1/8 teaspoon fine sea salt or to taste
- 1/8 teaspoon black pepper freshly ground, or to taste
For assembling and grilling
- 2 tablespoons butter softened, divided, plus more as needed for the pan
- 1/2 cup shredded cheese for filling such as cheddar, mozzarella, or provolone
- 2 tablespoons shredded cheese optional, for extra crispy edges in the waffle maker
Instructions
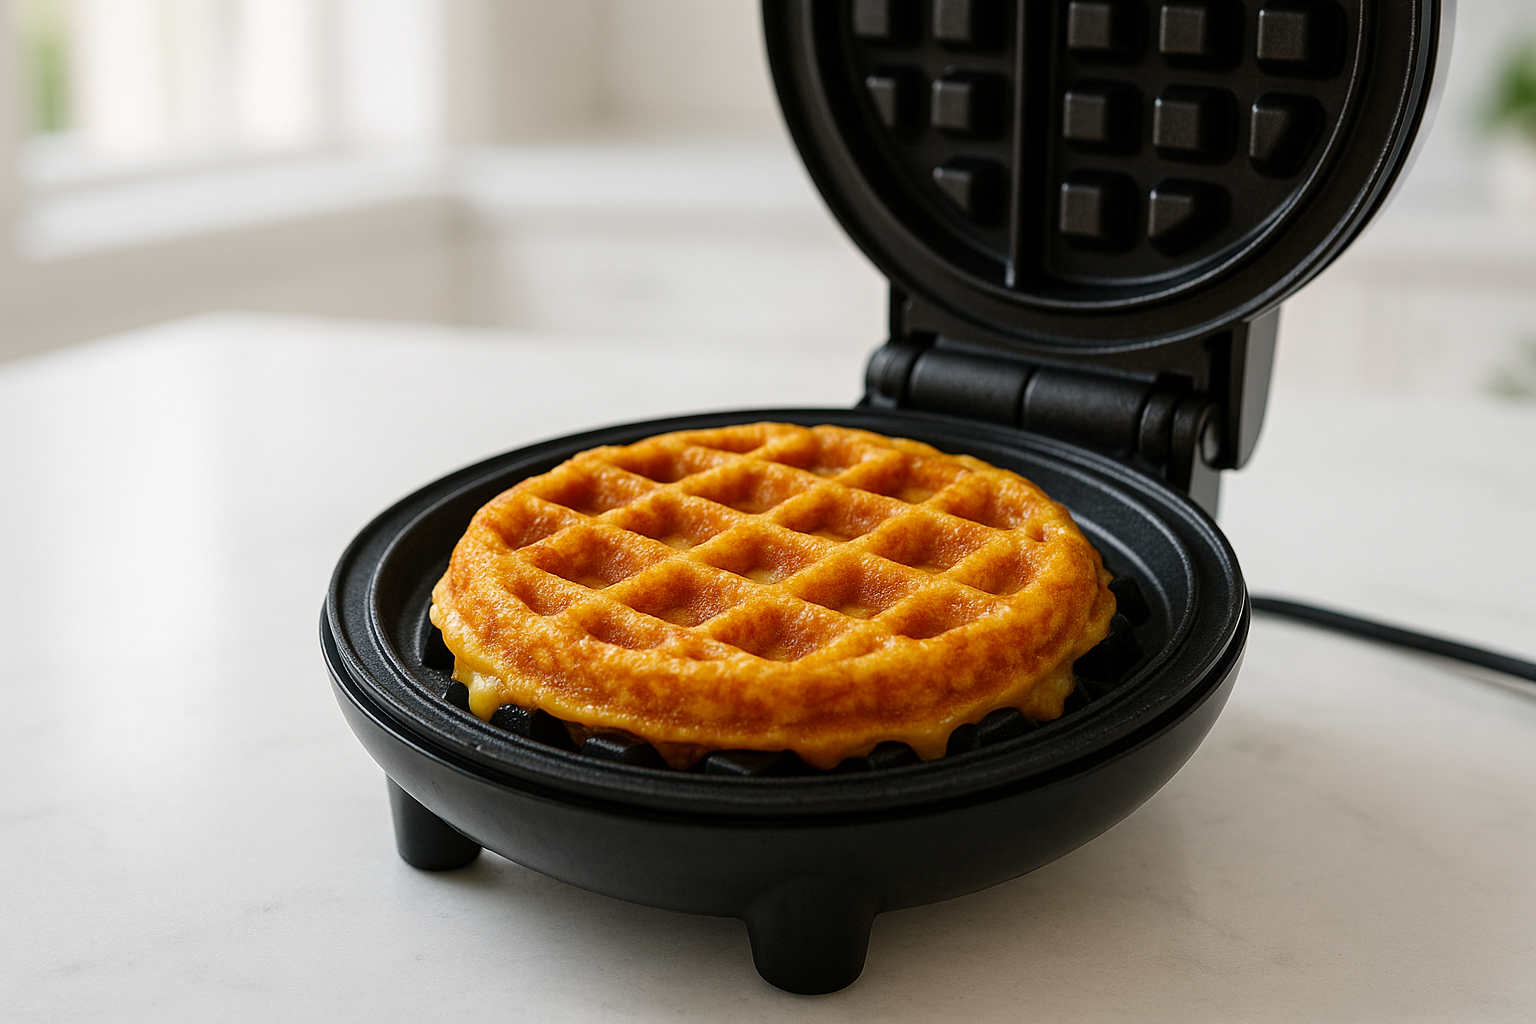
- Preheat the waffle maker according to the manufacturer’s instructions until fully hot.
- Add the eggs to a medium bowl and whisk until well combined and lightly frothy.
- Stir in 3/4 cup of the shredded cheddar, almond flour, Parmesan, garlic powder, Italian seasoning, salt, and pepper until a thick, even batter forms.
- Lightly grease the waffle plates if needed, then spoon about 3 tablespoons of batter into the center of the waffle maker for each chaffle, spreading gently without overfilling; sprinkle a small pinch of the remaining shredded cheddar directly onto the plates first if you want extra crispy edges.
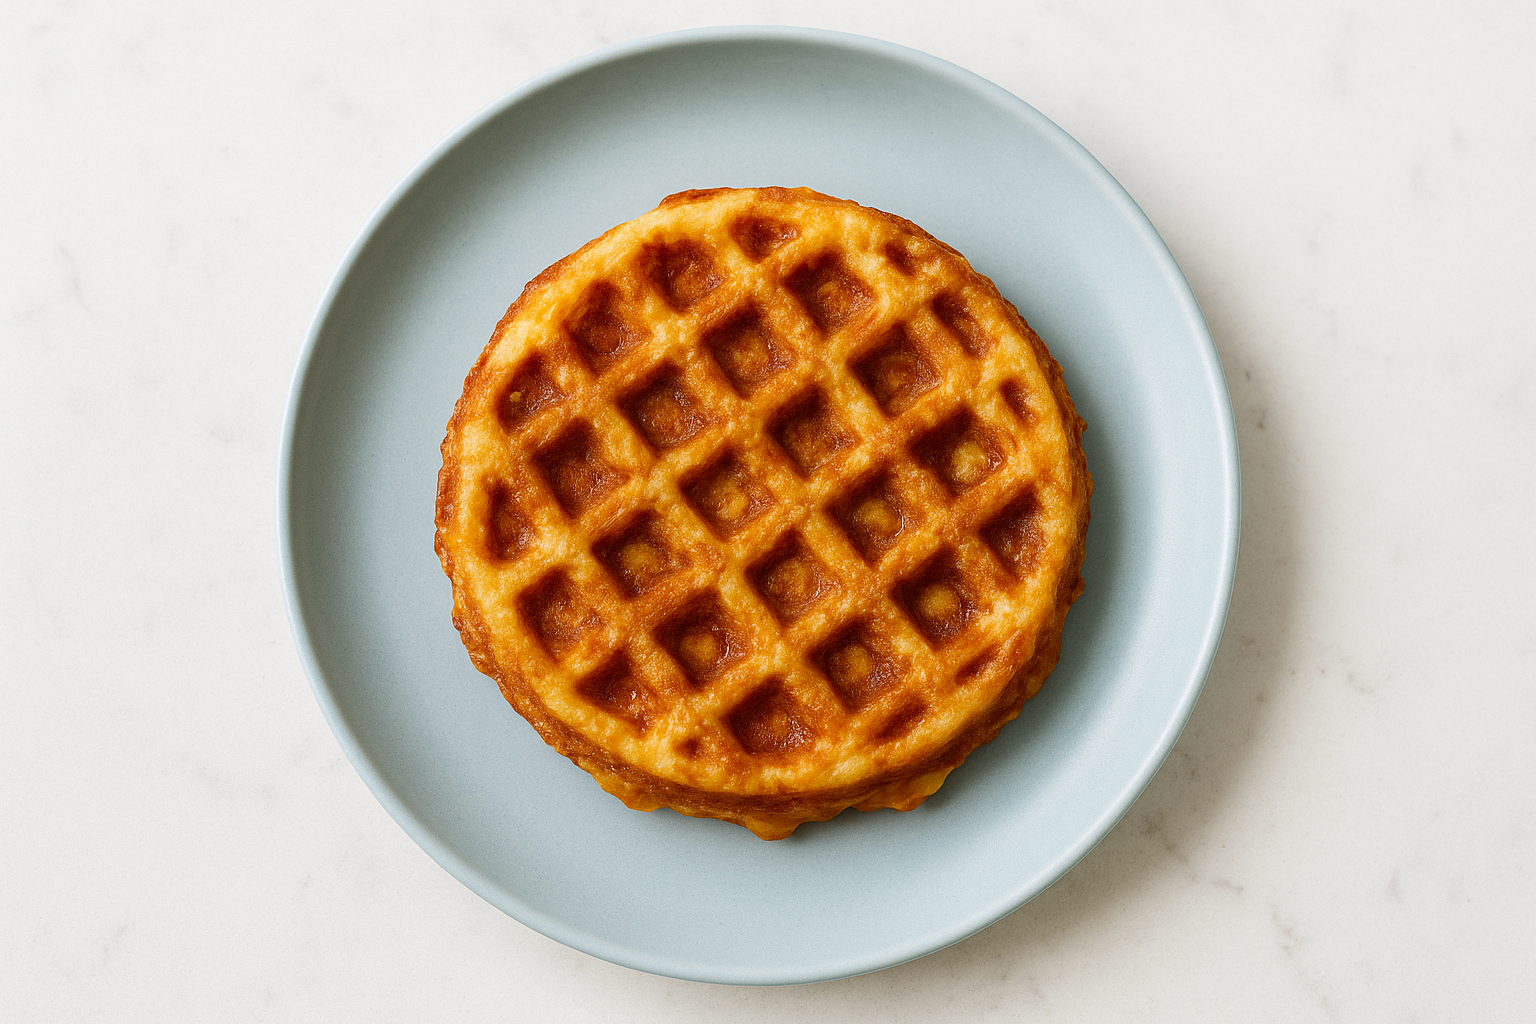
- Close the waffle maker and cook the chaffles for 3 to 4 minutes, or until deeply golden and crisp around the edges and they release easily from the plates.
- Transfer the cooked chaffles to a wire rack and let them cool for 2 to 3 minutes to set and prevent sogginess.
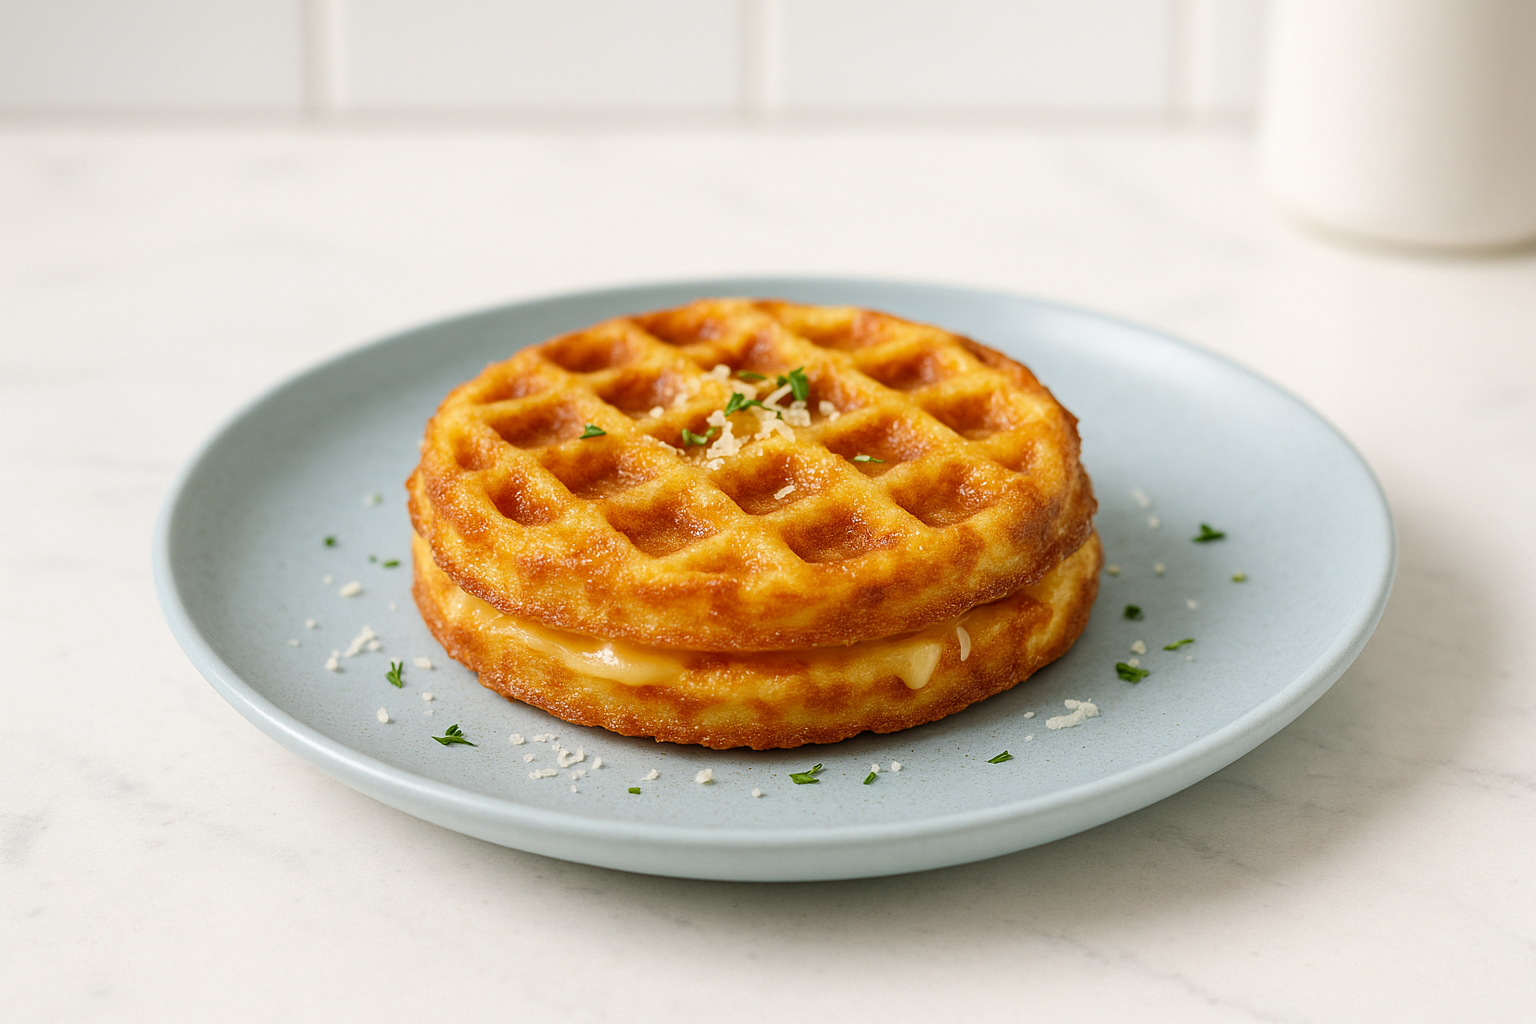
- Spread one side of each chaffle lightly with softened butter.
- Place one chaffle buttered side down in a skillet over medium heat, top with the shredded cheese for filling in an even layer, then place the second chaffle on top with the buttered side facing up.
- Cook the assembled chaffle sandwich for 2 to 3 minutes per side, pressing gently with a spatula, until the outside is golden and crisp and the cheese inside is fully melted.
- Transfer to a cutting board, let rest for 1 minute, then slice and serve hot with your favorite keto-friendly sides or dipping sauce.
Notes
Nutrition